@Autowired用法详解-程序员宅基地
技术标签: spring
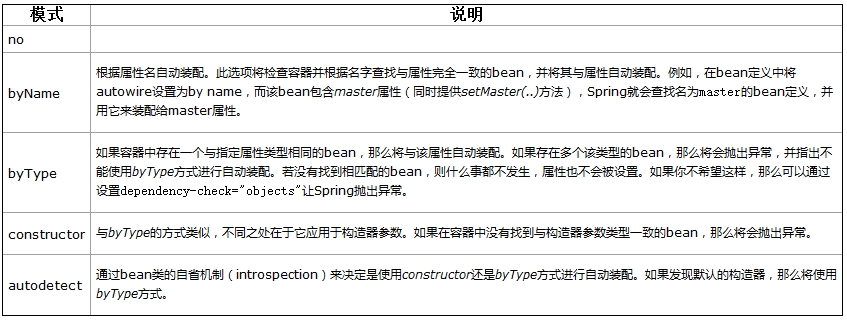
- 首先要知道另一个东西,default-autowire,它是在xml文件中进行配置的,可以设置为byName、byType、constructor和autodetect;比如byName,不用显式的在bean中写出依赖的对象,它会自动的匹配其它bean中id名与本bean的set**相同的,并自动装载。
- @Autowired是用在JavaBean中的注解,通过byType形式,用来给指定的字段或方法注入所需的外部资源。
- 两者的功能是一样的,就是能减少或者消除属性或构造器参数的设置,只是配置地方不一样而已。
- autowire四种模式的区别:
先看一下bean实例化和@Autowired装配过程:
-
一切都是从bean工厂的getBean方法开始的,一旦该方法调用总会返回一个bean实例,无论当前是否存在,不存在就实例化一个并装配,否则直接返回。(Spring MVC是在什么时候开始执行bean的实例化过程的呢?其实就在组件扫描完成之后)
实例化和装配过程中会多次递归调用getBean方法来解决类之间的依赖。
Spring几乎考虑了所有可能性,所以方法特别复杂但完整有条理。
@Autowired最终是根据类型来查找和装配元素的,但是我们设置了
<beans default-autowire="byName"/>后会影响最终的类型匹配查找。因为在前面有根据BeanDefinition的autowire类型设置PropertyValue值得一步,其中会有新实例的创建和注册。就是那个autowireByName方法。
下面通过@Autowired来说明一下用法
Setter 方法中的 @Autowired
你可以在 JavaBean中的 setter 方法中使用 @Autowired 注解。当 Spring遇到一个在 setter 方法中使用的 @Autowired 注解,它会在方法中执行 byType 自动装配。
这里是 TextEditor.java 文件的内容:-
package com.tutorialspoint; import org.springframework.beans.factory.annotation.Autowired; public class TextEditor { private SpellChecker spellChecker; @Autowired public void setSpellChecker( SpellChecker spellChecker ){ this.spellChecker = spellChecker; } public SpellChecker getSpellChecker( ) { return spellChecker; } public void spellCheck() { spellChecker.checkSpelling(); } }- 1
- 2
- 3
- 4
- 5
- 6
- 7
- 8
- 9
- 10
- 11
- 12
- 13
- 14
- 15
下面是另一个依赖的类文件 SpellChecker.java 的内容:
package com.tutorialspoint; public class SpellChecker { public SpellChecker(){ System.out.println("Inside SpellChecker constructor." ); } public void checkSpelling(){ System.out.println("Inside checkSpelling." ); } }- 1
- 2
- 3
- 4
- 5
- 6
- 7
- 8
- 9
下面是 MainApp.java 文件的内容:
package com.tutorialspoint; import org.springframework.context.ApplicationContext; import org.springframework.context.support.ClassPathXmlApplicationContext; public class MainApp { public static void main(String[] args) { ApplicationContext context = new ClassPathXmlApplicationContext("Beans.xml"); TextEditor te = (TextEditor) context.getBean("textEditor"); te.spellCheck(); } }- 1
- 2
- 3
- 4
- 5
- 6
- 7
- 8
- 9
- 10
下面是配置文件 Beans.xml:
<?xml version="1.0" encoding="UTF-8"?> <beans xmlns="http://www.springframework.org/schema/beans" xmlns:xsi="http://www.w3.org/2001/XMLSchema-instance" xmlns:context="http://www.springframework.org/schema/context" xsi:schemaLocation="http://www.springframework.org/schema/beans http://www.springframework.org/schema/beans/spring-beans-3.0.xsd http://www.springframework.org/schema/context http://www.springframework.org/schema/context/spring-context-3.0.xsd"> <context:annotation-config/> <!-- Definition for textEditor bean without constructor-arg --> <bean id="textEditor" class="com.tutorialspoint.TextEditor"> </bean> <!-- Definition for spellChecker bean --> <bean id="spellChecker" class="com.tutorialspoint.SpellChecker"> </bean> </beans>- 1
- 2
- 3
- 4
- 5
- 6
- 7
- 8
- 9
- 10
- 11
- 12
- 13
- 14
- 15
- 16
- 17
- 18
- 19
- 20
- 21
一旦你已经完成的创建了源文件和 bean 配置文件,让我们运行一下应用程序。如果你的应用程序一切都正常的话,这将会输出以下消息:
Inside SpellChecker constructor.
Inside checkSpelling.- 属性中的 @Autowired
你可以在属性中使用 @Autowired 注解来除去 setter 方法。当时使用 为自动连接属性传递的时候,Spring 会将这些传递过来的值或者引用自动分配给那些属性。所以利用在属性中 @Autowired 的用法,你的 TextEditor.java 文件将变成如下所示:
package com.tutorialspoint; import org.springframework.beans.factory.annotation.Autowired; public class TextEditor { @Autowired private SpellChecker spellChecker; public TextEditor() { System.out.println("Inside TextEditor constructor." ); } public SpellChecker getSpellChecker( ){ return spellChecker; } public void spellCheck(){ spellChecker.checkSpelling(); } }- 1
- 2
- 3
- 4
- 5
- 6
- 7
- 8
- 9
- 10
- 11
- 12
- 13
- 14
- 15
下面是配置文件 Beans.xml:
<?xml version="1.0" encoding="UTF-8"?> <beans xmlns="http://www.springframework.org/schema/beans" xmlns:xsi="http://www.w3.org/2001/XMLSchema-instance" xmlns:context="http://www.springframework.org/schema/context" xsi:schemaLocation="http://www.springframework.org/schema/beans http://www.springframework.org/schema/beans/spring-beans-3.0.xsd http://www.springframework.org/schema/context http://www.springframework.org/schema/context/spring-context-3.0.xsd"> <context:annotation-config/> <!-- Definition for textEditor bean --> <bean id="textEditor" class="com.tutorialspoint.TextEditor"> </bean> <!-- Definition for spellChecker bean --> <bean id="spellChecker" class="com.tutorialspoint.SpellChecker"> </bean> </beans>- 1
- 2
- 3
- 4
- 5
- 6
- 7
- 8
- 9
- 10
- 11
- 12
- 13
- 14
- 15
- 16
- 17
- 18
- 19
- 20
- 21
一旦你在源文件和 bean 配置文件中完成了上面两处改变,让我们运行一下应用程序。如果你的应用程序一切都正常的话,这将会输出以下消息:
Inside TextEditor constructor.
Inside SpellChecker constructor.
Inside checkSpelling.- 构造函数中的 @Autowired
你也可以在构造函数中使用 @Autowired。一个构造函数 @Autowired 说明当创建 bean 时,即使在 XML 文件中没有使用 元素配置 bean ,构造函数也会被自动连接。让我们检查一下下面的示例。
这里是 TextEditor.java 文件的内容:
package com.tutorialspoint; import org.springframework.beans.factory.annotation.Autowired; public class TextEditor { private SpellChecker spellChecker; @Autowired public TextEditor(SpellChecker spellChecker){ System.out.println("Inside TextEditor constructor." ); this.spellChecker = spellChecker; } public void spellCheck(){ spellChecker.checkSpelling(); } }- 1
- 2
- 3
- 4
- 5
- 6
- 7
- 8
- 9
- 10
- 11
- 12
- 13
下面是配置文件 Beans.xml:
<?xml version="1.0" encoding="UTF-8"?> <beans xmlns="http://www.springframework.org/schema/beans" xmlns:xsi="http://www.w3.org/2001/XMLSchema-instance" xmlns:context="http://www.springframework.org/schema/context" xsi:schemaLocation="http://www.springframework.org/schema/beans http://www.springframework.org/schema/beans/spring-beans-3.0.xsd http://www.springframework.org/schema/context http://www.springframework.org/schema/context/spring-context-3.0.xsd"> <context:annotation-config/> <!-- Definition for textEditor bean without constructor-arg --> <bean id="textEditor" class="com.tutorialspoint.TextEditor"> </bean> <!-- Definition for spellChecker bean --> <bean id="spellChecker" class="com.tutorialspoint.SpellChecker"> </bean> </beans>- 1
- 2
- 3
- 4
- 5
- 6
- 7
- 8
- 9
- 10
- 11
- 12
- 13
- 14
- 15
- 16
- 17
- 18
- 19
- 20
- 21
一旦你在源文件和 bean 配置文件中完成了上面两处改变,让我们运行一下应用程序。如果你的应用程序一切都正常的话,这将会输出以下消息:
Inside TextEditor constructor.
Inside SpellChecker constructor.
Inside checkSpelling.- @Autowired 的(required=false)选项
默认情况下,@Autowired 注解意味着依赖是必须的,它类似于 @Required 注解,然而,你可以使用 @Autowired 的 (required=false) 选项关闭默认行为。
即使你不为 age 属性传递任何参数,下面的示例也会成功运行,但是对于 name 属性则需要一个参数。你可以自己尝试一下这个示例,因为除了只有 Student.java 文件被修改以外,它和 @Required 注解示例是相似的。
package com.tutorialspoint; import org.springframework.beans.factory.annotation.Autowired; public class Student { private Integer age; private String name; @Autowired(required=false) public void setAge(Integer age) { this.age = age; } public Integer getAge() { return age; } @Autowired public void setName(String name) { this.name = name; } public String getName() { return name; } }- 1
- 2
- 3
- 4
- 5
- 6
- 7
- 8
- 9
- 10
- 11
- 12
- 13
- 14
- 15
- 16
- 17
- 18
- 19
- 20
Quote:
http://my.oschina.net/HeliosFly/blog/203902
http://wiki.jikexueyuan.com/project/spring/annotation-based-configuration/spring-autowired-annotation.html转载地址:https://blog.csdn.net/u013257679/article/details/52295106/
智能推荐
python中文显示不出来_解决Python词云库wordcloud不显示中文的问题-程序员宅基地
文章浏览阅读2.6k次。解决Python词云库wordcloud不显示中文的问题2018-11-25背景:wordcloud是基于Python开发的词云生成库,功能强大使用简单。github地址:https://github.com/amueller/word_cloudwordcloud默认是不支持显示中文的,中文会被显示成方框。安装:安装命令:pip install wordcloud解决:经过测试发现不支持显示中文..._词云python代码无法输出文字
JVM在线分析-解决问题的工具一(jinfo,jmap,jstack)_jmap 在线分析-程序员宅基地
文章浏览阅读807次。扩展。_jmap 在线分析
台式计算机cpu允许温度,玩游戏cpu温度多少正常(台式电脑夏季CPU一般温度多少)...-程序员宅基地
文章浏览阅读1.1w次。随着炎热夏季的到来,当玩游戏正爽的时候,电脑突然死机了,自动关机了,是不是有想给主机一脚的冲动呢?这个很大的原因是因为CPU温度过高导致的。很多新手玩家可能都有一个疑虑,cpu温度多少以下正常?有些说是60,有些说是70,到底多高CPU温度不会死机呢?首先我们先看看如何查看CPU的温度。下载鲁大师并安装,运行鲁大师软件,即可进入软件界面,并点击温度管理,即可看到电脑各个硬件的温度。鲁大师一般情况下..._台式机玩游戏温度多少正常
小白自学Python日记 Day2-打印打印打印!_puthon打印任务收获-程序员宅基地
文章浏览阅读243次。Day2-打印打印打印!我终于更新了!(哭腔)一、 最简单的打印最最简单的打印语句: print(“打印内容”)注意:python是全英的,符号记得是半角下面是我写的例子:然后进入power shell ,注意:你需要使用cd来进入你保存的例子的文件夹,保存时名字应该取为xxx.py我终于知道为什么文件夹取名都建议取英文了,因为进入的时候是真的很麻烦!如果你没有进入正确的文件夹..._puthon打印任务收获
Docker安装:Errors during downloading metadata for repository ‘appstream‘:_"cenerrors during download metadata for repository-程序员宅基地
文章浏览阅读1k次。centos8问题参考CentOS 8 EOL如何切换源? - 云服务器 ECS - 阿里云_"cenerrors during download metadata for repository \"appstream"
尚硅谷_谷粒学苑-微服务+全栈在线教育实战项目之旅_基于微服务的在线教育平台尚硅谷-程序员宅基地
文章浏览阅读2.7k次,点赞3次,收藏11次。SpringBoot+Maven+MabatisPlusmaven在新建springboot项目引入RELEASE版本出错maven在新建springboot项目引入RELEASE版本出错maven详解maven就是通过pom.xml中的配置,就能够从仓库获取到想要的jar包。仓库分为:本地仓库、第三方仓库(私服)、中央仓库springframework.boot:spring-boot-starter-parent:2.2.1.RELEASE’ not found若出现jar包下载不了只有两_基于微服务的在线教育平台尚硅谷
随便推点
网络学习第六天(路由器、VLAN)_路由和vlan-程序员宅基地
文章浏览阅读316次。路由的概念路由器它称之为网关设备。路由器就是用于连接不同网络的设备路由器是位于OSI模型的第三层。路由器通过路由决定数据的转发。网关的背景:当时每家计算机厂商,用于交换数据的通信程序(协议)和数据描述格式各不相同。因此,就把用于相互转换这些协议和格式的计算机称为网关。路由器与三层交换器的对比路由协议对比路由器的作用:1.路由寻址2.实现不同网络之间相连的功能3.通过路由决定数据的转发,转发策略称为 路由选择。VLAN相关技术什么是VLAN?中文名称叫:虚拟局域网。虚_路由和vlan
设置div背景颜色透明度,内部元素不透明_div设置透明度,里面的内容不透明-程序员宅基地
文章浏览阅读2.8w次,点赞6次,收藏22次。设置div背景颜色透明度,内部元素不透明:.demo{ background-color:rgba(255,255,255,0.15) } 错误方式:.demo{ background-color:#5CACEE;opacity:0.75;} 这样会导致div里面的元素内容和背景颜色一起变透明只针对谷歌浏览器的测试_div设置透明度,里面的内容不透明
Discuz!代码大全-程序员宅基地
文章浏览阅读563次。1.[ u]文字:在文字的位置可以任意加入您需要的字符,显示为下划线效果。2.[ align=center]文字:在文字的位置可以任意加入您需要的字符,center位置center表示居中,left表示居左,right表示居右。5.[ color=red]文字:输入您的颜色代码,在标签的中间插入文字可以实现文字颜色改变。6.[ SIZE=数字]文字:输入您的字体大小,在标签的中间插入文..._discuzcode 大全
iOS NSTimer定时器-程序员宅基地
文章浏览阅读2.6k次。iOS中定时器有三种,分别是NSTimer、CADisplayLink、dispatch_source,下面就分别对这三种计时器进行说明。一、NSTimerNSTimer这种定时器用的比较多,但是特别需要注意释放问题,如果处理不好很容易引起循环引用问题,造成内存泄漏。1.1 NSTimer的创建NSTimer有两种创建方法。方法一:这种方法虽然创建了NSTimer,但是定时器却没有起作用。这种方式创建的NSTimer,需要加入到NSRunLoop中,有NSRunLoop的驱动才会让定时器跑起来。_ios nstimer
Linux常用命令_ls-lmore-程序员宅基地
文章浏览阅读4.8k次,点赞17次,收藏51次。Linux的命令有几百个,对程序员来说,常用的并不多,考虑各位是初学者,先学习本章节前15个命令就可以了,其它的命令以后用到的时候再学习。1、开机 物理机服务器,按下电源开关,就像windows开机一样。 在VMware中点击“开启此虚拟机”。2、登录 启动完成后,输入用户名和密码,一般情况下,不要用root用户..._ls-lmore
MySQL基础命令_mysql -u user-程序员宅基地
文章浏览阅读4.1k次。1.登录MYSQL系统命令打开DOS命令框shengfen,以管理员的身份运行命令1:mysql -u usernae -p password命令2:mysql -u username -p password -h 需要连接的mysql主机名(localhost本地主机名)或是mysql的ip地址(默认为:127.0.0.1)-P 端口号(默认:3306端口)使用其中任意一个就OK,输入命令后DOS命令框得到mysql>就说明已经进入了mysql系统2. 查看mysql当中的._mysql -u user