vscode插件开发——不同类型文件不同代码提示 & 更多应用场景_vscode如何应用代码提示文件-程序员宅基地
技术标签: vscode vscode插件开发 前端 javascript
许久不见,这次继续给大家带来插件开发的内容,主要内容是针对大家私信问的比较多的,同时同步一下我自己开发的插件,会给大家介绍更多的应用场景
如果是初次进行插件开发,且没有搭建环境,请参考我的第一篇文章
https://blog.csdn.net/luoluoyang23/article/details/124543453
这里是第二篇文章,进行了一部分内容的补充
https://blog.csdn.net/luoluoyang23/article/details/125027963
代码放gitee了,有不懂的地方直接对照源码看
https://gitee.com/mminogo/better-react-ts-tips
即将废弃—— CompletionItem.textEdit
在我第一篇文章中,有一个重点介绍的API,CompletionItem.textEdit,textEdit 能够决定代码补全的内容和插入文本的位置,而在vscode新版本的更新中,这个属性要被放弃,让我们看看官方原话
https://code.visualstudio.com/api/references/vscode-api
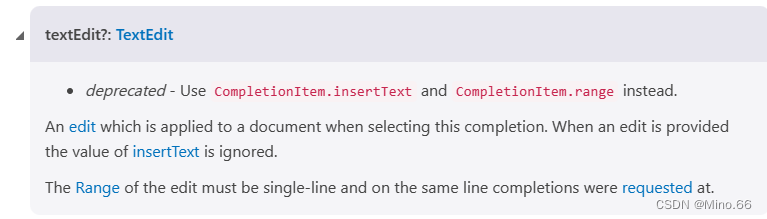
很明显,textEdit 会被 insertText 和 range 取代,功能上并没有变化,只是将 textEdit 进行了拆分,很好理解,我们知道原来的 textEdit 就是由这两个属性组成的
// 原有 TextEdit声明
export interface TextEdit {

    /**
     * The range of the text document to be manipulated. To insert
     * text into a document create a range where start === end.
     */
    range: Range;
    /**
     * The string to be inserted. For delete operations use an
     * empty string.
     */
    newText: string;
}
现在newText会被insertText 取代,而range会被新增加的range属性取代。
除此以外还有很多小变化,大家可以自行参考官方文档,这里不做赘述。
不同类型文件不同代码提示
开始介绍一个我们标题提到的一个应用场景,就是不同的文件使用不同的配置,然后能够使用不同的代码提示。如果你和我一样是做的语言服务器类型的插件的话,那么我们会有 language server 和language-client;
若您不了解语言服务器,可以参考我的其他文章,也可以去官网查看相关内容
官网
https://code.visualstudio.com/api/language-extensions/language-server-extension-guide
中文网站
https://liiked.github.io/VS-Code-Extension-Doc-ZH/#/language-extensions/language-server-extension-guide
服务端配置
现在就分为在server 进行配置还是在 client 进行配置,若要在 server 进行配置,其实我们之前已经提到过,在服务端入口文件 server.ts 中,我们会用到下面的函数
// documents:const documents: TextDocuments<TextDocument> = new TextDocuments(TextDocument);,一般官方例子会给你放在文档开头那几行
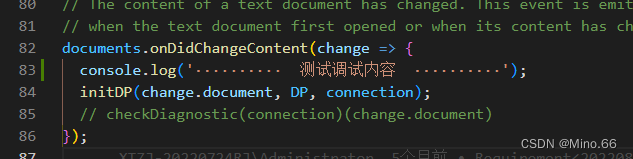
documents.onDidChangeContent(change => {
···
});
我们可以通过change获取文件名
documents.onDidChangeContent(change => {

	console.log(change.document.uri);
	// 输出 E:/你的路径/xxx.ts	就是你vscode中当前打开的文件
});
这里介绍这个函数是因为在官网给的样例里面直接就用了这个函数,但是我们看函数名字也能看出来,这个函数是在每次文本内容发生变更时就会调用,我们打开了什么类型的文件是在打开一瞬间就能确定的,因此更推荐使用下面的函数
documents.onDidOpen((e) => {

	console.log(e.document.uri);
});
这里建议大家创建一个全局的对象记录文件名等内容,然后在这个函数内进行更新
documents.onDidOpen((e) => {

	// initDP不是官方的,是我自己写的函数,DP是我创建的全局对象,记录文件信息
	initDP(e.document, DP, connection);
});
既然文件名都拿到了,要做文件类型判断就非常简单了,在获取代码补全配置时进行文件类型判断即可,一般我是这样做的
// connection:const connection = createConnection(ProposedFeatures.all);
connection.onCompletion(
	(_textDocumentPosition: TextDocumentPositionParams): CompletionItem[] => {

		const itemList = [];
		if (getFileType(DP) === 'ts' || getFileType(DP) === 'tsx') {

			itemList.push( 配置列表1 );
		} else itemList.push( 配置列表2 ),
		return itemList;
	}
);
这里的配置列表也是接我之前的文章内容写的,它本质很简单,在官网的例子了,它是这样子的
[
	{

		label: 'TypeScript',
		kind: CompletionItemKind.Text,
		data: 1
	},
	{

		label: 'JavaScript',
		kind: CompletionItemKind.Text,
		data: 2
	}
];
就只是一个数组,我只是进行了封装而已
客户端配置
需要配置客户端的人可能会更多一点,因为大部分人可能并没有配置语言服务器,这种情况下入口文件一般是 extension.ts ,当然搭建了语言服务器的也有这个文件,不管是不是语言服务器,要在这个文件内做文件类型判断方式都是一样的
客户端不同的是,可以通过一个属性直接拿到当前打开的文件名
window.activeTextEditor.document.uri
当然,大家如果在窗口打开时需要进行更多的操作,可以使用下面这个函数
window.onDidChangeActiveTextEditor(e => {

	console.log(e.document.uri);
})
需要注意的是这个函数也是,只有在切换文件时才会触发,第一次打开窗口时不会触发
一样,拿到了文件名,之后类型判断就简单了,这里不再赘述。
最后给大家介绍一下我的应用场景吧,在之前我写过一篇文章,讲了markdown文件类型的代码补充
https://blog.csdn.net/luoluoyang23/article/details/126195562
后来我进行了拓展,我需要在 typescript 文件中,快捷使用 React 里面的一些方法,我期待的效果是下面这样的
可以看到,它的效果是获取选中的文本,然后进行判断,最后对文本进行修正补充。
结合上面的内容,我决定和markdown转译共用一个命令,不然命令太多可能会和其他插件冲突,且不好记忆,因此在 extension.ts 中我基本上没有做太多修改,只是改了命令的名称
const command = 'codeTool.codeRender';
// context:function activate传入的对象
context.subscriptions.push(commands.registerCommand(command, commandHandle));
这里的 commandHandle 就是关键了
// 命令的回调函数
// 这部分函数全是我自己封装的,官方没有提供这个,不要傻傻的一直在官网找哦
export function commandHandle () {

	// 获取选中文本,设置并记录一些属性
	setDocInfo(docInfo);
	// DP是一个全局对象,专门用于记录文档属性,这里拿到了文件类型
	// 这个位置就用到了上面提到的 window.onDidChangeActiveTextEditor ,它会实时更新 DP 的属性
	const fileType = DP.fileType;
	// setInsertContent 会根据传入的配置,确定和调整最后插入的文本
	if (fileType === 'md') {

		// markdownConfig 是markdown的代码补全配置
		setInsertContent(docInfo, markdownConfig);
	} else if (fileType === 'ts' || fileType === 'tsx') {

		// typescriptConfig 是typescript的代码补全配置
		setInsertContent(docInfo, typescriptConfig);
	}
	// 最后执行插入和替换文本的动作
	doInsert(docInfo);
}
然后就是 typescriptConfig 了,这里把我写的配置给大家做参考
// 与 server 不同,这里的 ConfigItem 是我自己定义的类型
const use: ConfigItem = {

	// 匹配的标签,用户输入任何 以use开头的,执行命令后都能够进行匹配
	hitLabel: 'use',
	// 匹配的长度,长度为3,即只匹配到use,use后面可以是任意内容
	hitLength: 3,
	// 匹配成功后执行的函数,因为每个代码片段不同,要做的操作也不同
	hitHandle: (params: HitHandleParamsObject) => {

		// 当前用户选中的文本:useword
		const {
     currentText } = params;
		// 截取后面的部分:word
		const needWord = currentText.slice(3);
		// 文本调整:Word
		const insertWord = `${
      needWord.slice(0, 1).toUpperCase()}${
      needWord.slice(1)}`;
		// 最后返回:const [word, setWord] = useState();
		return `const [${
      needWord}, set${
      insertWord}] = useState();`;
	},
	// 标签,表示这个代码片段有函数需要执行
	isDyanmic: true,
}
// 注意!注意!注意!
// 注意!注意!注意!
// 上面内容不是官方提供的,是完全自己写的,不要在官方文档中查找这部分内容
这样这个功能就完成了,代码可以在 markdown 文档中提供专为 markdown 设计的代码片段,在 typescript 中提供专为 typescript 设计的代码片段,非常灵活
最后,我还是把这部分代码贴出来,但是仅供参考,因为定制的内容比较多,直接copy的话少东西可能会报错,路径请自行调整,如果有疑问欢迎在评论区评论!
extension.ts
/* --------------------------------------------------------------------------------------------
* Copyright (c) Microsoft Corporation. All rights reserved.
* Licensed under the MIT License. See License.txt in the project root for license information.
* ------------------------------------------------------------------------------------------ */
import * as path from 'path';
import {
workspace,
ExtensionContext,
commands,
window,
} from 'vscode';
import {
LanguageClient,
LanguageClientOptions,
ServerOptions,
TransportKind,
} from 'vscode-languageclient/node';
import {
initDP } from './global-object/properties';
import {
commandHandle } from './config/common';
let client: LanguageClient;
window.onDidChangeActiveTextEditor(e => {
initDP(e.document);
})
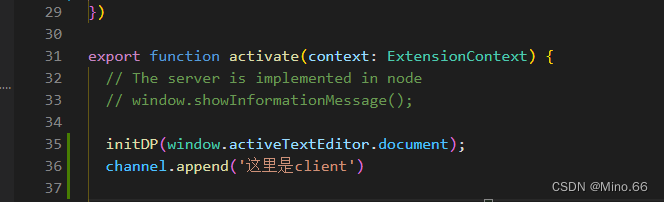
export function activate(context: ExtensionContext) {
// The server is implemented in node
// window.showInformationMessage();
initDP(window.activeTextEditor.document);
const serverModule = context.asAbsolutePath(
path.join('server', 'out', 'server.js')
);
// The debug options for the server
// --inspect=6009: runs the server in Node's Inspector mode so VS Code can attach to the server for debugging
const debugOptions = {
execArgv: ['--nolazy', '--inspect=6009'] };
// If the extension is launched in debug mode then the debug server options are used
// Otherwise the run options are used
const serverOptions: ServerOptions = {
run: {
module: serverModule, transport: TransportKind.ipc },
debug: {
module: serverModule,
transport: TransportKind.ipc,
options: debugOptions
}
};
// Options to control the language client
const clientOptions: LanguageClientOptions = {
documentSelector: [
{
scheme: 'file', language: 'typescript' },
{
scheme: 'file', language: 'typescriptreact' },
{
scheme: 'file', language: 'markdown' },
],
synchronize: {
// Notify the server about file changes to '.clientrc files contained in the workspace
fileEvents: workspace.createFileSystemWatcher('**/.clientrc')
}
};
// Create the language client and start the client.
client = new LanguageClient(
'languageServerExample',
'Language Server Example',
serverOptions,
clientOptions
);
const command = 'codeTool.codeRender';
context.subscriptions.push(commands.registerCommand(command, commandHandle));
// Start the client. This will also launch the server
client.start();
}
export function deactivate(): Thenable<void> | undefined {
if (!client) {
return undefined;
}
return client.stop();
}
./global-object/properties.ts
import {

	TextDocument,
	window,
} from 'vscode';

export const DP = {

	fullPath: '',
	fileName: '',
	fileType: '',
}

// 初始化全局对象
export const initDP = (document: TextDocument) => {

	const fullPath = document.uri.path;
	DP.fullPath = fullPath;
	const pathArray = fullPath.split('/');
	const fileName = pathArray[pathArray.length - 1];
	DP.fileName = fileName;
	const fileType = fileName.slice(fileName.lastIndexOf('.') + 1);
	DP.fileType = fileType;
}
./config/common.ts
import {
     window, Position, Selection } from 'vscode';
import {
     DocInfoType, ConfigItem } from './interface';
import {
     DP } from '../global-object/properties';
import markdownConfig from './markdownConfig';
import typescriptConfig from './typescriptConfig';
// import { channel } from '../global-object/properties';

const docInfo: DocInfoType = {

	start: '',
	end: '',
	currentText: '',
	currentBlank: '',
	insertContent: '',
	selection: '',
}

// 设置文档信息,获取选中的文本
export const setDocInfo = (docInfo: DocInfoType) => {

	const activeTextEditor = window.activeTextEditor;
	const activeDocument = activeTextEditor.document;

	// 1. 获取所有选中行信息
	const selection = activeTextEditor.selection;
	const {
     start, end } = selection;

	// 当前行文本内容
	const curLineText = activeDocument.lineAt(start.line).text;
	// 当前行非空文本起始位置
	const curLineStartCharacter = curLineText.search(/\S/i);

	docInfo.selection = selection;
	docInfo.start = start;
	docInfo.end = end;
	// 当前选中文本内容
	docInfo.currentText = curLineText.substring(start.character, end.character);
	// 当前行为空文本
	docInfo.currentBlank = curLineText.substring(0, curLineStartCharacter);
}

// 对需要转译的文本进行匹配
const matchHitLabel = (docInfo: DocInfoType, config: ConfigItem) => {

	if (config.hitLength && config.hitLabel === docInfo.currentText.slice(0, config.hitLength)) {

		return true;
	} else if (config.hitLabel === docInfo.currentText) return true;
	return false;
}

// 确定以及调整插入的内容
export const setInsertContent = (docInfo: DocInfoType, configList: ConfigItem[][]) => {

	for (let configParent of configList) {

		for (let config of configParent) {

			if (matchHitLabel(docInfo, config)) {

				if (!config.isDyanmic) {

					docInfo.insertContent = config.insertContent;
					return;
				}
				const hitParams = {

					currentBlank: docInfo.currentBlank,
					currentText: docInfo.currentText,
				}
				docInfo.insertContent = config.hitHandle(hitParams);
				return;
			}
		}
	}
}

// 插入文本
export const doInsert = (docInfo: DocInfoType) => {

	if (docInfo.start instanceof Position) {

		const replace =
			docInfo.selection instanceof Selection ?
			docInfo.selection :
			new Position(docInfo.start.line + 1, 0);
			window.activeTextEditor.edit((TextEditorEdit) => {

			TextEditorEdit.replace(
				replace,
				`${
      docInfo.insertContent}`
			);
		});
	}
}

// 命令的回调函数
export function commandHandle () {

	setDocInfo(docInfo);
	// const fileType = DP.fileType;
	setInsertContent(docInfo, typescriptConfig);
	doInsert(docInfo);
}
typescriptConfig,注意,下面包含三个文件
// typescriptConfig/index.ts
import {
     dynamicConfig } from './config/configList';

export default [
	dynamicConfig,
];


// ./config/configList
import TsDynamicConfig from './dynamicConfig';

const dynamicConfig = [
	TsDynamicConfig.use,
]

export {

	dynamicConfig,
}


// ./dynamicConfig
import {
     ConfigItem, HitHandleParamsObject } from '../../interface';

const configType = 'dynamic';

const use: ConfigItem = {

	configType,
	hitLabel: 'use',
	hitLength: 3,
	hitHandle: (params: HitHandleParamsObject) => {

		const {
     currentText } = params;
		const needWord = currentText.slice(3);
		const insertWord = `${
      needWord.slice(0, 1).toUpperCase()}${
      needWord.slice(1)}`;
		return `const [${
      needWord}, set${
      insertWord}] = useState();`;
	},
	isDyanmic: true,
}

const TsDynamicConfig = {

	use,
}

export default TsDynamicConfig;
根据补全内容动态导入包体
再介绍一个非常常见的场景,我们在平时写代码时进行的代码补全,很有可能补全的内容直接写进去会报错,这时候编辑器会帮助我们自动导入相关的包。那万一这个包已经导入了呢?这时候编辑器并不会再次导入,显得非常智能。
这个功能用我们的语言服务器自然是能做的,实现方法很多,给大家介绍一个稍微简单粗暴一点的办法。
在语言服务器中,我们的 server.ts 可以通过很多方法拿到编辑区全部的文本内容,拿我们上面提到的 documents.onDidChangeContent 举例
documents.onDidChangeContent(change => {

	console.log(change.document.getText());
});

对,这样就能拿到我们当前打开文件内的所有文本内容,还是上面提到的,我们可以声明一个全局对象记录这些内容,然后用这个函数实时更新对象的属性
现在,我们拿到了全部的代码内容,那我们要判断是否导入了某个包直接用正则不就能做到吗,这里给大家参考一下我的代码,还存在一点小问题,不过勉强能用
// 确定额外插入内容的位置(导入某个包)
// item:CompletionItem
// DP:全局对象,保存着文档相关的属性
// reg:正则,不同的item有不同的正则,是相互绑定的
// mdn:导入包的名称和路径,也和item绑定
// insertContent: 插入文本,和item绑定
// 这部分还没优化,很多和item绑定的东西写进item就行,只需要重新封装个interface就可以了,这里大家将就看一下吧
export const additionalTextRangeFind: BaseTool = (item, DP, reg, mdn, insertContent) => {

	const text = DP.text;
	let m: RegExpExecArray | null;
	m = reg.moduleReg.pattern.exec(text)
	let range
	if (
			item.textEdit &&
			'range' in item.textEdit &&
			DP.positionAt &&
			DP.offsetAt
		) {

		range = item.textEdit.range
		if (m) {

			// 文件内已经存在module,判定为已经导入
		} else {

			// 文件内不存在module,判断当前文件内是否已经导入过对应的包
			m = reg.packageReg.pattern.exec(text)
			if (m) {

				// 导入过对应的包,在相应位置插入导入module
				range = {

					start: DP.positionAt(m.index),
					end: initRange.end
				}
				item.additionalTextEdits = [
					{

						newText: `, ${
      mdn} `,
						range: {

							start: {

								line: range.start.line,
								character: range.start.character
							},
							end: {

								line: range.start.line,
								character: range.start.character
							},
						}
					}
				]
			} else {

				// 文件内没有导入过对应的包,取最末尾的import进行导入
				let temp
				while (temp = reg.commonReg.pattern.exec(text)) {

					m = temp
				}
				range = {

					start: m ? DP.positionAt(m.index) : initPosition,
					end: m ? DP.positionAt(m.index) : initPosition,
				}
				item.additionalTextEdits = [
					{

						newText: insertContent,
						range: {

							start: {

								line: range.start.line + 1,
								character: range.start.character
							},
							end: {

								line: range.end.line + 1,
								character: range.end.character
							}
						}
					}
				]
			}
		}
	}
}
简单给大家展示一下效果
这是没有导入对应的包的,如果这个包已经存在,则不会再次导入
这里只是给大家介绍了原理,具体函数调用的时机大家可以自己根据需求决定。当然,这是最简单粗暴的实现方法,还有更好的办法,大家可以自己去官网查看,这里不再展开
调试
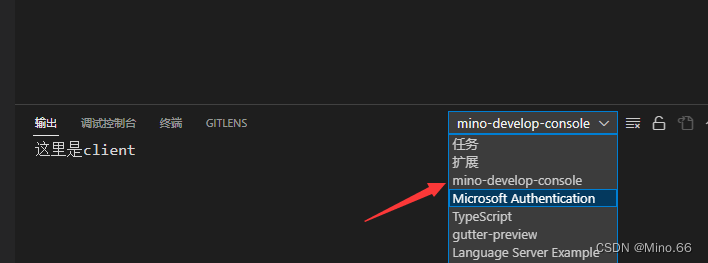
最后补充点调试相关的内容吧,很简单,如果你开发的是语言服务器,且需要查看 server 端的控制台输出,直接用 console 就行
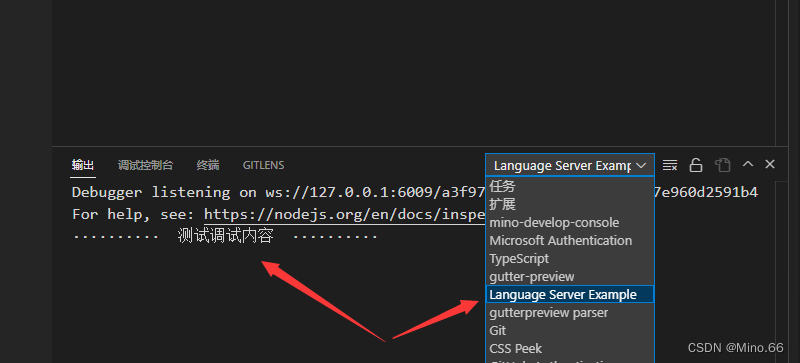
这是 server 端的,那么 client 的呢,也很简单。在你认为合适的地方声明一个控制台对象
export const channel = window.createOutputChannel('mino-develop-console');
在你想要看输出的地方调用即可
那么以上就是全部的内容了,如果有任何疑问欢迎在评论区进行讨论
智能推荐
hive使用适用场景_大数据入门:Hive应用场景-程序员宅基地
文章浏览阅读5.8k次。在大数据的发展当中,大数据技术生态的组件,也在不断地拓展开来,而其中的Hive组件,作为Hadoop的数据仓库工具,可以实现对Hadoop集群当中的大规模数据进行相应的数据处理。今天我们的大数据入门分享,就主要来讲讲,Hive应用场景。关于Hive,首先需要明确的一点就是,Hive并非数据库,Hive所提供的数据存储、查询和分析功能,本质上来说,并非传统数据库所提供的存储、查询、分析功能。Hive..._hive应用场景
zblog采集-织梦全自动采集插件-织梦免费采集插件_zblog 网页采集插件-程序员宅基地
文章浏览阅读496次。Zblog是由Zblog开发团队开发的一款小巧而强大的基于Asp和PHP平台的开源程序,但是插件市场上的Zblog采集插件,没有一款能打的,要么就是没有SEO文章内容处理,要么就是功能单一。很少有适合SEO站长的Zblog采集。人们都知道Zblog采集接口都是对Zblog采集不熟悉的人做的,很多人采取模拟登陆的方法进行发布文章,也有很多人直接操作数据库发布文章,然而这些都或多或少的产生各种问题,发布速度慢、文章内容未经严格过滤,导致安全性问题、不能发Tag、不能自动创建分类等。但是使用Zblog采._zblog 网页采集插件
Flink学习四:提交Flink运行job_flink定时运行job-程序员宅基地
文章浏览阅读2.4k次,点赞2次,收藏2次。restUI页面提交1.1 添加上传jar包1.2 提交任务job1.3 查看提交的任务2. 命令行提交./flink-1.9.3/bin/flink run -c com.qu.wc.StreamWordCount -p 2 FlinkTutorial-1.0-SNAPSHOT.jar3. 命令行查看正在运行的job./flink-1.9.3/bin/flink list4. 命令行查看所有job./flink-1.9.3/bin/flink list --all._flink定时运行job
STM32-LED闪烁项目总结_嵌入式stm32闪烁led实验总结-程序员宅基地
文章浏览阅读1k次,点赞2次,收藏6次。这个项目是基于STM32的LED闪烁项目,主要目的是让学习者熟悉STM32的基本操作和编程方法。在这个项目中,我们将使用STM32作为控制器,通过对GPIO口的控制实现LED灯的闪烁。这个STM32 LED闪烁的项目是一个非常简单的入门项目,但它可以帮助学习者熟悉STM32的编程方法和GPIO口的使用。在这个项目中,我们通过对GPIO口的控制实现了LED灯的闪烁。LED闪烁是STM32入门课程的基础操作之一,它旨在教学生如何使用STM32开发板控制LED灯的闪烁。_嵌入式stm32闪烁led实验总结
Debezium安装部署和将服务托管到systemctl-程序员宅基地
文章浏览阅读63次。本文介绍了安装和部署Debezium的详细步骤,并演示了如何将Debezium服务托管到systemctl以进行方便的管理。本文将详细介绍如何安装和部署Debezium,并将其服务托管到systemctl。解压缩后,将得到一个名为"debezium"的目录,其中包含Debezium的二进制文件和其他必要的资源。注意替换"ExecStart"中的"/path/to/debezium"为实际的Debezium目录路径。接下来,需要下载Debezium的压缩包,并将其解压到所需的目录。
Android 控制屏幕唤醒常亮或熄灭_android实现拿起手机亮屏-程序员宅基地
文章浏览阅读4.4k次。需求:在诗词曲文项目中,诗词整篇朗读的时候,文章没有读完会因为屏幕熄灭停止朗读。要求:在文章没有朗读完毕之前屏幕常亮,读完以后屏幕常亮关闭;1.权限配置:设置电源管理的权限。
随便推点
目标检测简介-程序员宅基地
文章浏览阅读2.3k次。目标检测简介、评估标准、经典算法_目标检测
记SQL server安装后无法连接127.0.0.1解决方法_sqlserver 127 0 01 无法连接-程序员宅基地
文章浏览阅读6.3k次,点赞4次,收藏9次。实训时需要安装SQL server2008 R所以我上网上找了一个.exe 的安装包链接:https://pan.baidu.com/s/1_FkhB8XJy3Js_rFADhdtmA提取码:ztki注:解压后1.04G安装时Microsoft需下载.NET,更新安装后会自动安装如下:点击第一个傻瓜式安装,唯一注意的是在修改路径的时候如下不可修改:到安装实例的时候就可以修改啦数据..._sqlserver 127 0 01 无法连接
js 获取对象的所有key值,用来遍历_js 遍历对象的key-程序员宅基地
文章浏览阅读7.4k次。1. Object.keys(item); 获取到了key之后就可以遍历的时候直接使用这个进行遍历所有的key跟valuevar infoItem={ name:'xiaowu', age:'18',}//的出来的keys就是[name,age]var keys=Object.keys(infoItem);2. 通常用于以下实力中 <div *ngFor="let item of keys"> <div>{{item}}.._js 遍历对象的key
粒子群算法(PSO)求解路径规划_粒子群算法路径规划-程序员宅基地
文章浏览阅读2.2w次,点赞51次,收藏310次。粒子群算法求解路径规划路径规划问题描述 给定环境信息,如果该环境内有障碍物,寻求起始点到目标点的最短路径, 并且路径不能与障碍物相交,如图 1.1.1 所示。1.2 粒子群算法求解1.2.1 求解思路 粒子群优化算法(PSO),粒子群中的每一个粒子都代表一个问题的可能解, 通过粒子个体的简单行为,群体内的信息交互实现问题求解的智能性。 在路径规划中,我们将每一条路径规划为一个粒子,每个粒子群群有 n 个粒 子,即有 n 条路径,同时,每个粒子又有 m 个染色体,即中间过渡点的_粒子群算法路径规划
量化评价:稳健的业绩评价指标_rar 海龟-程序员宅基地
文章浏览阅读353次。所谓稳健的评估指标,是指在评估的过程中数据的轻微变化并不会显著的影响一个统计指标。而不稳健的评估指标则相反,在对交易系统进行回测时,参数值的轻微变化会带来不稳健指标的大幅变化。对于不稳健的评估指标,任何对数据有影响的因素都会对测试结果产生过大的影响,这很容易导致数据过拟合。_rar 海龟
IAP在ARM Cortex-M3微控制器实现原理_value line devices connectivity line devices-程序员宅基地
文章浏览阅读607次,点赞2次,收藏7次。–基于STM32F103ZET6的UART通讯实现一、什么是IAP,为什么要IAPIAP即为In Application Programming(在应用中编程),一般情况下,以STM32F10x系列芯片为主控制器的设备在出厂时就已经使用J-Link仿真器将应用代码烧录了,如果在设备使用过程中需要进行应用代码的更换、升级等操作的话,则可能需要将设备返回原厂并拆解出来再使用J-Link重新烧录代码,这就增加了很多不必要的麻烦。站在用户的角度来说,就是能让用户自己来更换设备里边的代码程序而厂家这边只需要提供给_value line devices connectivity line devices